In this post, we will show you how to create a simple Spring boot web application with a REST api. We will Dockerize this application and finally deploy it with Kubernetes.
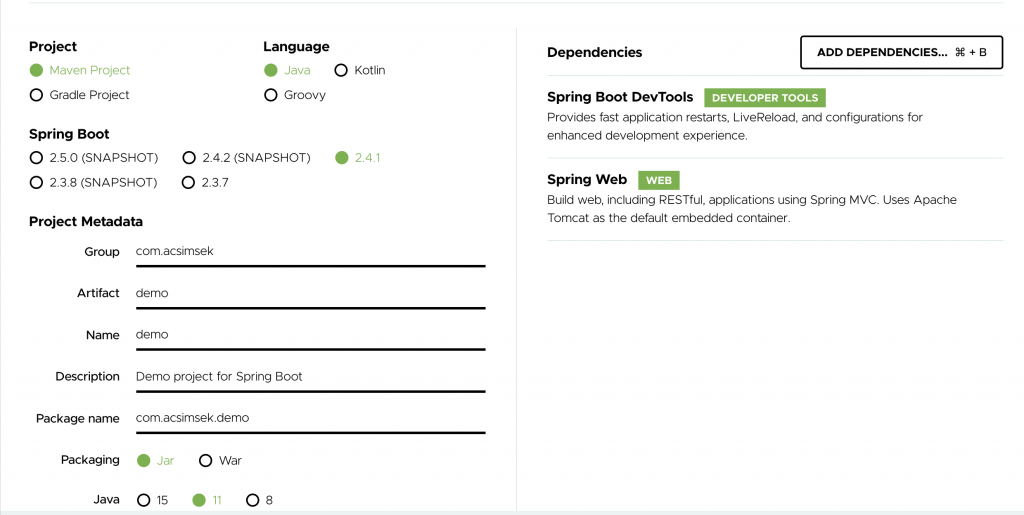
To create the spring boot application go to https://start.spring.io. Then select maven as project type, java for language, spring boot version, packaging, java version. Add these two dependencies of spring boot dev tools and spring web.
After you downloaded the created project folder from spring initializr, extract it and open it in your favorite IDE. Let’s add a rest controller and a simple get mapping to create a hello world message.
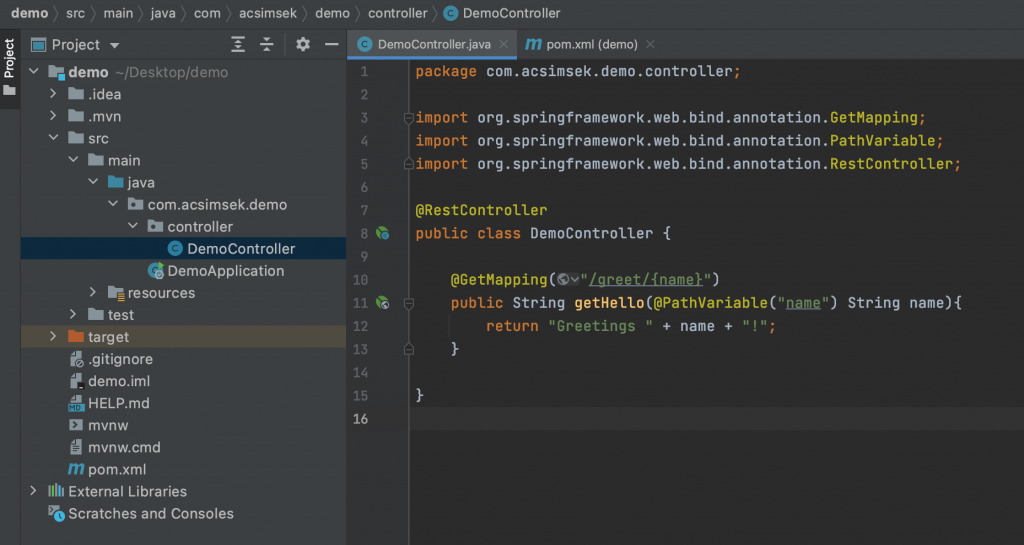
As you can see this is a very simple web application which will print the given name in path variable. Let’s build our simple application and get a jar file out of it.
mvn clean installIt will create our jar file in the target folder. Let’s run and test our web app.
java -jar ./target/demo-0.0.1-SNAPSHOT.jarOpen up a browser window and type this into address bar -> localhost:8080/greet/Peter

Now that our application is finished and ready to be deployed, let’s dockerize it first. Create a file named Dockerfile inside your project directory and put this in.
FROM adoptopenjdk:11-jre-hotspot

ARG JAR_FILE=target/*.jar

COPY ${JAR_FILE} app.jar

EXPOSE 8080

CMD ["java","-jar","/app.jar"]
What this file actually does is, it pulls the ready made linux image on which java 11 is already installed. Then it copies the jar file from your target directory into the container, exposes port 8080 and runs the spring boot application when the container is started from the image.
Let’s build our image
docker build -t acsimsek/demo-springboot:0.0.1 .After the image is successfully built, we can see it by listing our local images
docker imagesREPOSITORY TAG IMAGE ID CREATED SIZE
acsimsek/demo-springboot 0.0.1 997edaeead5f 24 minutes ago 264MBNow we can run our image into a container and see if it works
docker run -d -p 8080:8080 acsimsek/demo-springboot:0.0.1check if container created and started
docker psCONTAINER ID IMAGE COMMAND CREATED STATUS PORTS NAMES
c24885b1b412 acsimsek/demo-springboot:0.0.1 "java -jar /app.jar" 5 seconds ago Up 4 seconds 0.0.0.0:8080->8080/tcp awesome_hopperOpen up a browser window and test the app -> localhost:8080/greet/Peter

Congratz! our application is running in a container. We can now deploy our application on a kubernetes cluster. For that we need to install Kubernetes command line tool kubectl https://kubernetes.io/docs/tasks/tools/install-kubectl/ and minikube https://minikube.sigs.k8s.io/docs/start/ which runs a local kubernetes cluster.
minikube startAfter we install everything, we create our kubernetes deployment.yml file in our project directory.
---
apiVersion: v1
kind: Service
metadata:
  name: demoservice
spec:
  selector:
    app: demoapp
  ports:
    - protocol: "TCP"
      # Port accessible inside cluster
      port: 8081
      # Port to forward to inside the pod
      targetPort: 8080
      # Port accessible outside cluster
      nodePort: 30001
  type: LoadBalancer

---
apiVersion: apps/v1
kind: Deployment
metadata:
  name: demoappdeployment
spec:
  replicas: 5
  selector:
    matchLabels:
      app: demoapp
  template:
    metadata:
      labels:
        app: demoapp
    spec:
      containers:
        - name: demoapp
          image: acsimsek/demo-springboot:0.0.1
          ports:
            - containerPort: 8080
So our deployment.yml file comprises of two parts, Service and Deployment. In Service block, we actually define a LoadBalancer. Take a look at the ports section. You will see that there are three different types of ports defined. And in the Deployment block, you can see how we defined our container image, port and number of replicas.
In order for this deployment.yml file to work, we need to push our newly created image to an image registry, in this case dockerhub.
login and push your image
docker login
docker push acsimsek/demo-springboot:0.0.1
now we can run our deployment
sudo kubectl create -f deployment.ymlcheck the deployment
kubectl get deploymentsNAME READY UP-TO-DATE AVAILABLE AGE
demoappdeployment 5/5 5 5 19mcheck pods / replicas
kubectl get podsNAME READY STATUS RESTARTS AGE
demoappdeployment-746567855b-2bk6g 1/1 Running 0 19m
demoappdeployment-746567855b-7vtmp 1/1 Running 0 19m
demoappdeployment-746567855b-mf68c 1/1 Running 0 19m
demoappdeployment-746567855b-rwgm7 1/1 Running 0 19m
demoappdeployment-746567855b-vnt5d 1/1 Running 0 19mcheck load balancer
kubectl get servicesNAME TYPE CLUSTER-IP EXTERNAL-IP PORT(S) AGE
demoservice LoadBalancer 10.96.199.83 <pending> 8081:30001/TCP 20m
kubernetes ClusterIP 10.96.0.1 <none> 443/TCP 160mSo far so good, now let’s check if the application is actually running inside kubernetes pods, for that we need to check the ip address of our minikube cluster.
minikube ip192.168.64.2copy that ip address and paste it in browser by using the new external port we defined like this -> 192.168.64.2:30001/greet/Peter

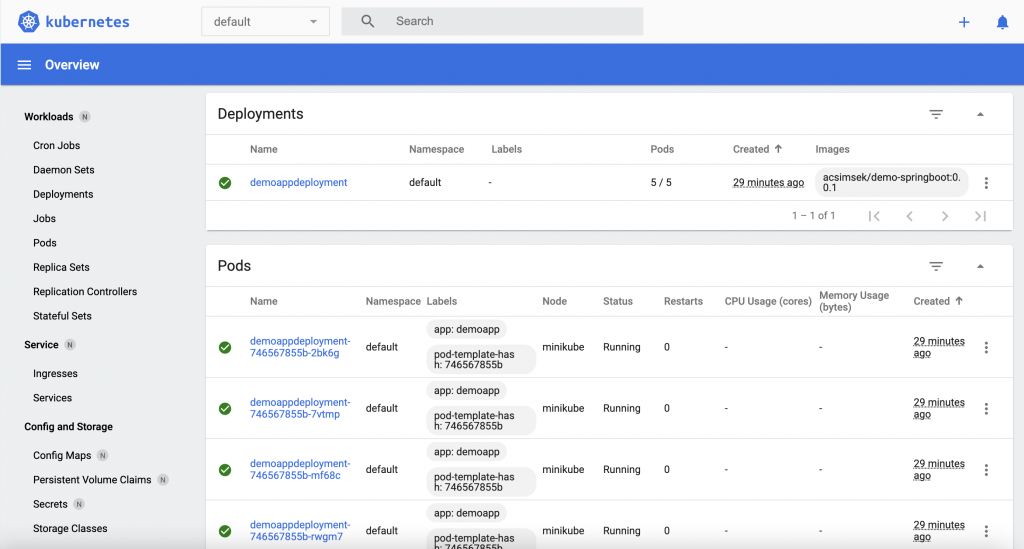
Awesome! now our application is actually running in 5 kubernetes pods with a load balancer.
Minikube provides also a decent web ui to check information about the cluster. You can run it like this.
minikube dashboardand it will open a new browser window displaying all the information about deployments, pods, services and more.
You can delete some pods from the Pods menu and you will see that immediately after you kill some pods, kubernetes will spin up some new pods because we defines the number of replicas to be 5. That is one of the many more great things about kubernetes.